Easy Painted Pumpkins : 2013 Halloween Decorations Ideas
Thursday, October 24, 2013
Add Comment
This Halloween, create artistic pumpkins with paint, fun embellishments, and little (to no!) carving.
Get inspired by this 2013 Halloween Decorations Ideas ideas . I hope that you will find it useful for you ... Enjoy it !!


Get inspired by this 2013 Halloween Decorations Ideas ideas . I hope that you will find it useful for you ... Enjoy it !!

For a rustic look, paint a plaid pattern on a pumpkin. Use various colors and stripe widths.

Create a litter of kittens with painted pumpkins.
First, coat each pumpkin with matte finish sealant to dull the waxy surface.
Paint the pumpkins different colors, applying two or three coats of paint (let the paint dry between coats). Draw a nose, mouth, and whiskers on each pumpkin with a black felt tip marker.
For the eyes, draw eye shape outlines and eyelashes using the marker.
Paint the inside of the eyes white, let dry, then paint green irises outlined in black.
Cut out ear shapes from crafts foam, and hot-glue them in place.

To get this patterned look, draw a template for your design (or create it on a computer).
Trace the design onto contact paper, and cut out the interior of the design using fine tip scissors.
Adhere the stencil to the pumpkin.
Using a lightly paint coated stencil brush, apply paint with a bouncing motion.
Carefully remove the stencil and repeat as desired.

Grab the paintbrushes and get crafty with these designs that use pumpkins as canvases.
The simple graphic motifs, inspired by country decor, are a treat to display all autumn long.

This witch has rhythm! Tall pumpkins set the stage for this soft shoe scenario.
All you need to keep in step is black paint, ribbon, and shallow carving.

The painted sinister spider dangling on its luminous web warns visitors to beware.
The lines of the web are carved just deep enough to let the glow of the candle shine through the pumpkin wall.

Chisel windows in a painted mansion and carve a moon behind.
Candlelight from inside the pumpkin will bring the haunted scene to life.

Paint a pumpkin your favorite color for a stylish approach to Halloween decorating. Sprinkle the wet paint with glitter to add some sparkle to the color.

For a pumpkin that spans from Halloween to Thanksgiving, try a leaf motif. Find different types of leaves, trace the shapes on the pumpkin, and paint.

Add color and texture to your pumpkins with graphic stripes.
First, paint the entire pumpkin black.
When dry, create a design by scraping off the black paint to reveal the orange pumpkin rind beneath.
To use the painted pumpkin as a vase, carve out a narrow hole in the center to fit an existing vase.
Insert vase into the hole, then add flowers.

When summer fades to autumn and songbirds start to fly south, a birdbath becomes a perfect perch for a pumpkin adorned with a macabre silhouette.
Choose any number of eerie shapes for your outdoor display: think crow, black cat, bat, witch, or spider. Apply a coat of varnish after the paint dries to protect the pumpkin from the elements.
Tufts of garden moss help keep the pumpkin stable on its perch.

Play a game of cat and mouse this Halloween with this set of silhouettes.
Download our free templates, then trace the cat onto a large pumpkin and the mice onto three smaller pumpkins.
Fill in the outlines with black paint, or use a paint pen for a quick and easy alternative.
Go to the next slide to see another silhouette creature.

To create this patchwork design, paint your pumpkin with latex primer and let dry.
Then apply a base coat with cream color latex paint and allow to dry.
Mark off squares with masking tape, or download our free pattern below.
Paint an overcoat of khaki color latex paint; let dry.
Remove tape to expose cream color paint.

Use paper doilies as stencils to create intricate, lacelike designs.

Take miniature pumpkins to bewitching new heights with an aerial display.
Draw bats on white pumpkins with a permanent marker.
Cut a length of thick jute and knot one end to a large washer.
Tie a loop in the other end.
Punch holes in the top and bottom of the pumpkin, and use wire to pull the twine through the holes. (The washer supports the pumpkin's weight, and the loop attaches to the shepherd's hook.)

Like any culinary confection, this tiered treat has all the right ingredients. Select two pumpkins and a Cinderella squash that stack easily. "Ice" the pumpkins and squash in pretty pastel paints, embellish with lacy trims and adhesive gems, and stack.

A black cat and a bat this painted pumpkin duo is "spooktacular"! Spray paint two pumpkins luscious matte black. Craft cardstock features, and pin in place. We carved the cat and bat faces, but you can cut them from cardstock, too.

Too big to pop in your mouth, these candy corn look painted pumpkins still look good enough to eat. Use cone shape pumpkins and spray paint to create these Halloween treats.

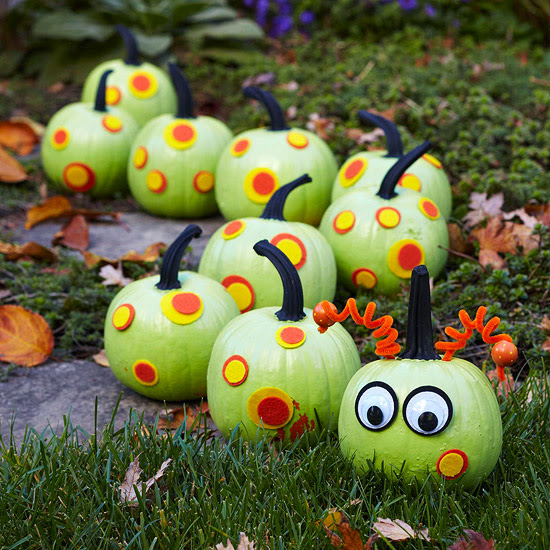
Here, pumpkins go to great lengths to form a caterpillar.
Paint pumpkins melon green, and paint their stems black.
Decorate the body with adhesive felt dots, and denote the head with a pair of googly eyes and curled pipe cleaner antennae. Arrange the pumpkins in a creepy, crawling S shape.

You'll have to get your fingers wet to leave your mark on this playful pumpkin!
0 Response to "Easy Painted Pumpkins : 2013 Halloween Decorations Ideas"
Post a Comment